Saturday, June 13, 2026

Chale Chalo - My 5K Experience

 " I am capable of more than I thought " is what crossed my mind this morning as I crossed the finish line after walking the 5K. race . I was also pleasantly surprised to find out I had walked the whole distance in under an hour. 

I woke up extremely early today bursting with nervous excitement. Despite being my third 5K I had second thoughts. I was scared about finishing last and being embarrassed. But once at the race I was energized by seeing my fellow members.  I had already decided it was not a competition for me. I was there to walk, finish and feel good. And I surely did. It took lot of motivation to show up to a race on a weekend morning. It was all a mind game. Finding my stride, chatting along the way and taking in the fresh air around is what carried me to the finish line.  

Several thousand steps each day for past few months,  a 5K race and  the finish line- it all starts somewhere. Thanks to " Arogyam Dhanasampada - Health is Wealth " initiative which got me started .The finish line I had envisioned was one where my stamina would end. But today I proved myself wrong. And that is all it takes to stay put and keep walking.

Sunday, February 13, 2022

Valentine Day Project 3 - DIY Starbucks Coffee

 I am a huge Starbucks fan. If you have read my previous posts by now you know caffeine is an inseparable part of my daily life. I live by the motto "But First Coffee". And so does my kid's teacher. When we got the wish list for homeroom teacher I saw the teacher mentioned Starbucks. Instead of getting a gift card I found a very nice pink coffee travel mug as a gift for her . It said valentine gift all over it. So I instantly got it. Instead of just wrapping it in a gift bag I decided to make a Valentine box for the teacher's gift . The kids are supposed to make valentine boxes to keep their classroom goodies in. So I took this teacher gift a step further . I made a Starbucks coffee cup with a planter and bowl . First I painted the  plastic planter  pink . I chose pink because I had that color at hand. Plus pink goes well with the valentine theme. Red would have been equally good . I inverted a white plastic bowl on top. But it did not look like whipped cream. So I tore bits of white tissue paper. Then scrunched these bits and added onto the outer part and bottom of the bowl with hot glue. Finally rolled a green cardstock to make a straw. Using my heart shaped punch I added the heart shaped sprinkles onto the whipped cream. The actual Starbucks cardboard cup sleeve came in handy. I glued two of those together and added this around  the planter. It also has the logo on it. I put the travel mug inside this planter ( Oops!I mean cup ) to disguise the gift. I hope my kid's teacher enjoys this DIY planter turned Starbucks coffee cup as much as she enjoys her actual travel mug . What are some of your favorite gifts for teachers ?


Valentine Day Project 2- DIY Truck Box

 My kid and I made this fun truck from a Kleenex box . This truck is to keep her school valentine goodies in. I loved the challenge to use an existing box and come up with a storage container . We were able to recycle existing trash, use supplies at hand and not spend a dime . On Pinterest I saw many shoe box projects . But I wanted to use something else . Kleenex box lying around the house looked perfect as it had an opening already to put stuff in. The Kleenex box is in the middle and is wrapped around in  3 pieces of cardboard. I used an empty diaper box to trace and cut the truck shapes for either sides . I made the top with another long piece of cardboard placed in between the truck shapes holding the Kleenex box.  I left the back flap open to put gifts in. It sort of mimics a trunk opening . Once the structure was ready I let my kid take over . The final decorations were largely my kid's creativity.  We used a heart shaped punch to add hearts on the top keeping in line with valentine day theme. My kid learnt to use the punch last year during our valentine project . ( check it here ) Of course we used scrap pieces of paper to punch out the heart shapes .The license plate reads "kisses ". The pink color, bunting and hearts made it all come together to look so  "lovely" in the end .

What kind of box would you use for your project ?


Valentine Day Project 1 - DIY Tshirt

Tomorrow is Valentine day. You all know that (I hope so !). I do not know if love is in the air but it sure is omnipresent in every single store, on shelves and all window displays. Ahh! the marketing strategies. 

Anyways we are supposed to wear red colored clothes for work tomorrow ( duh! ). I do not feel like wearing any of my current red sweaters or red tops. Guess why ? I do not know either. So keep guessing . Finally I decided on a DIY vinyl t shirt. Preowned but brand new plain red t shirt came in handy. Next I could not come up with any design to put on my t shirt. Heart, XOXO, hot air balloon seemed too cliche and not my cup of tea. Just then a cup of coffee literally came to my rescue. As I was sipping my coffee pondering about my outfit for tomorrow an idea started brewing in my mind. I had read this quote somewhere in the past. Given my love for caffeine ( and dependence on it ) it was just perfect. Instantly I pulled out my Cricut Explore 2. I found this SVG online for free which I tweaked a bit to change the font and placement. Voila! My outfit for tomorrow is ready. I used glitter silver HTV for the first time. I think the colors go so well together. I love the final outcome a lot . And who does not like a little sparkle and that too for valentine day . What do you all think ?


Sunday, January 16, 2022

Chutney Cravings - Indian Style Cranberry Chutney

 Cranberries are very tart. They are rich in . Cranberries are a fall staple in grocery markets . I love this tart, tangy and sour chutney. It goes well with not just parathas or white rice but also as dip for fritters .It is even a perfect addition to the cheese board .This chutney can be made on stovetop or in an instant pot. for Instant pot start with saute mode and then cook on high pressure mode for 5 mins. Allow natural pressure release. Add very little water while cooking in an Instant Pot. 

Ingredients -

Cranberries (fresh or frozen )

Ginger

Oil

Cumin seeds

Asafoetida

Turmeric 

Dried red chillies

Salt

Jaggery 

Instructions -

1. Heat oil and add cumin seeds. Add a pinch of asafoetida, dried red chillies and turmeric. 

2. After tempering  add roughly chopped pieces of ginger. Saute for 3-4mins.

3. Add washed cranberries and mix well. Cover with lid and let them cook for 5-7 mins till they start popping. The skin comes off and then they start bubbling. Stir again and let them cook for additional 3-5 mins .

4. Once it cools add the mixture to grinder with salt and jaggery . Then pulse coarsely to desired texture. 

5. Serve with rice, parathas or enjoy with a toasted slice of  bread .

Pandemic Pantry - Bread Pockets

Bread pockets are such an easy thing to make. Perfect for making a batch before hand or even for to go meals. I love easy recipes with fewer ingredients especially when I have to make them in bulk.  It has been a current favorite at our house for lunch box for past 2 weeks. Best part is I made them in my Instant Pot Vortex Air Fryer. So goodness of taste and healthy recipe all in one . Do give it  atry and let me know. 

Ingredients -

Whole wheat bread 

Olive oil 

Pizza sauce

Onion

Bell pepper

Carrots 

Corn 

Salt to taste 

Mozzarella cheese 

Instructions -

1. Chop all vegetables except corn finely for the filling .Heat oil and add pizza sauce. Saute it for 2-3 mins till it starts bubbling.

2. Add onion and saute till translucent .

3. Add remaining vegetables except corn and let them cook.

4. Finally add corn and saute for 1-2 mins.

5. Turn off the stove, add salt and then mix in shredded mozzarella cheese. 

6. While the filling is cooling down cut edges from brown bread slices. Then roll them flat with a rolling pin .

7. Once filling has cooled down stuff it into each slice and close edges with a touch of water . 

8. Preheat air fryer to 350F. Air fry for 5-6 mins and they are nice brown colored and crispy .


DIY Project - Dollar Tree Chalkboard Sign

 Chalkboard signs are all the rage. I so wanted to do a project with it for a while. And who does not love a project that costs nothing. My daughter had received this chalkboard sign from Dollar tree as a return gift at a birthday party. Miss N got her hands already on the sign and started her own version of design. So I had to quickly put it away and hide it . With Valentine's day approaching it was perfect opportunity to use this hidden away chalkboard sign. With my Cricut Explore Air 2 and vinyl rolls at hand here is what I came up with. I loved how the sign turned out. More so with the decor at the border by Miss N. Did you all love the sign ?


Thursday, January 6, 2022

DIY Mason Jar Wood Sign - 2

 In my last post I shared my christmas decor using the wood sign  Now it was time to use the blanks for personalized signs . They make great presents be it for christmas /festive seasons or even housewarming . I made one such sign for a sweet couple who moved into their house recently . I had fun using textured vinyl for the first time. The instructions for this project are same as the ones in my previous post here. What do you all think ?

Tips-

1. You can use paint instead of vinyl .

2. Drill a hole at the top of mason jar to make a hanger using twine or ribbon . 


DIY Mason Jar Wood Sign - 1

 Wood signs can be used anywhere for indoor or outdoor display. They can be used for  rustic home decor, welcome sign , lake house, country decor.....you name it . I decided to make a wood sign for christmas decoration. I had blank mason jar wood signs that I had got off of Amazon. With some nice patterned vinyl I came up with this christmas decor. What do you think ? 

Materials -

Blank mason jar wood sign 

Vinyl

Twine

Hot glue gun 

Cricut explore Air 2

Embellishments (optional )


Instructions -

1. I measured the blank wood sign. Given the mason jar shape I decided to use two different vinyls. One for the lid and other for the jar itself. Once I finalized the size and shape on Cricut design space it was time to cut the vinyl

2. I cut the patterned plaid vinyl for the jar itself. The lid shape was cut using the oracle 651 permanent plain black vinyl .

3. After weeding the vinyl I applied it onto the wood sign. I used a scraper for smooth application .

4. I wrapped the twine around the neck of the jar/sign. It also helped me to make a hanger in the back using a loop of the twine.  used hot glue gun to secure the twine to the wood sign.

5. I added lettering using white vinyl .Finally the foam snowflake was a little embellishment for my sign to look more festive .


Tips -

1. You can use adhesive spray onto the wood sign before vinyl application . It will help adhere the vinyl better .

2. Embellishments are optional but they surely add to the beauty of the sign .

3. Do not shy away from patterned vinyl. Play with patterns and blank vinyl just like you would put an outfit together .

4. You can trace the wood sign shape onto vinyl instead of using a software like design space. 


DIY Personalized Name Wood Sign

 I love the look of family name signs. I have seen them everywhere on Etsy, Pinterest, Amazon. These signs bring individuality into a room. They also make a budget friendly gift especially if you are a DIY kind of person. I recently made this sign and cannot be happier the way it came out. As always my Cricut Explore Air 2 did the magic. The recipient family absolutely loved it. They thought it was professionally made and not my DIY art. That was the best compliment I have ever received . Now I cannot wait to try some more wood signs .


Materials -

Blank wood sign 

Vinyl

Transfer tape

Cricut Explore Air 2


Step by step instructions -

1. I used Cricut design space to finalize my design . I used couple different fonts. The sizing of the letters was based on the size of blank wood .

2. I used Cricut Explore Air 2 to cut the letters/names onto the black vinyl. I used Oracle 651 permanent black vinyl. 

3. After carefully weeding the letters I used Cricut transfer tape to make the stickers. Next I carefully applied them onto the wood sign. The Cricut XL scraper came in very handy for the smooth wrinkle free application. 

4. I applied the letters part by part , carefully scraping to remove any bubbles before I pulled out the transfer tape finally. 

4. I used my heart punch for the little red hearts. The red color was the perfect pop of color against the white background and black letters.  


Tips -

1. Use a good sticky mat to help cut and weed the letters.

2. I highly recommend using a good quality transfer tape to make the final stickers after weeding .

3. Do not skip using the scraper for a smooth application. Take your time to apply the letters onto the board . 


Pandemic Pantry - Baked Pasta Recipe

 This pasta recipe has been going viral for a quite a while now. Another viral Tik tok trend that I almost ignored. But glad I did not because the recipe turned out just delicious. My new baking dish made me finally  try this recipe.  I am so glad I gave it a try. Nothing beats a sticky , rich , cheesy pasta sauce recipe. It is a very easy recipe. Baking a block of feta with tomatoes sounds too easy. Doesn't it ? Best part is it can be made ahead of time if there is a big crowd to feed later. It is very filling and leaves people satisfied. 


Ingredients -

Cherry tomatoes 

Feta cheese

Olive oil 

Garlic 

Basil 


Instructions  -

1. In a baking dish add cherry tomatoes and a block of feta cheese in the center. Add olive oil and give it a toss. Sprinkle some salt. Bake at 400 for 30 mins.

2. Crank up the heat to 450 and bake for another 10 mins.

3. Add crushed garlic, basil leaves and red pepper flakes and mix well .The heat from baking will help cook garlic and basil. 

4. Add cooked pasta to above sauce and mix well. 


Tips - 

1. If  you do not wish to change temperature settings you can bake for 40 mins at 400. 

2. You can add spinach instead of basil leaves .Play with herbs like thyme or oregano if you have any at hand . 

3. A scoop of pasta water will help coat the pasta evenly and smoothly. 


Friday, May 21, 2021

Thankful and International Tea Day

 "My dear, if you could give me a cup of tea to clear my muddle of a head I should better understand your affairs." -Charles Dickens . "

May 21st each year is observed as international tea day. On this occasion today I hope that all you fellow chai lovers are enjoying a sip of " kadak garam chai ". This morning when I was making myself some tea the irresistible aroma of tea brought back fond memories. Memories of enjoying cutting chai on tapri with friends in my college days. I thought of those numerous times when my Aai would instantly make "alyacha garam chaha"  as soon as she heard the rain drops on the roof top. Several other such special memories flooded my mind .

The weather was refreshing this morning. I sat on the deck sipping my first cup of tea amidst the chirping of birds. It just felt heavenly . The mug that I was drinking my tea in suddenly grabbed my attention. Instantly I felt thankful and grateful. Thankful for this cup of tea, thankful for another day and thankful for nature. The setting was perfect and so was the tea. More than ever I was grateful for the wellbeing of my family and friends. Amidst this pandemic and uncertainty one thing is sure - a hot cup of tea never fails to soothe me.  After all the ancient proverb aptly says -  "the path to heaven passess through a teapot. "


Wednesday, February 24, 2021

DIY Recycled Crafts

Resourcefulness is a must have trait for any person. It is the need of the hour that we teach our kids how products are made, the materials used and how this process impacts the planet . I always encourage Kid K to use the scraps of paper we have . We start searching in that bin whenever we decide to do any craft. Many a times the bin inspires and shapes our project in the process . The outcome is even better than what we had envisioned most of the times. Using recyclables in creative projects not only saves materials but boosts creativity .

Kid K had a project assigned in school. The project was in line with the theme "Reduce, reuse and recycle ". Kids were assigned to make a useful item from something at home that can be recycled instead of throwing away. After brainstorming multiple ideas this is what we came up with. We made a piggy bank from an empty salt container. All I helped was to cut the top part for the coin slit . She drew and cut the ears and nose. After wrapping the container with pink construction paper she glued the nose and ears . Finally she added the googly eyes and a pipe cleaner as a cute curly tail . Our mini heart punch came in handy for the emebellished ears . All I had to do was make little suggestions here and there but mainly encourage her . It took us less than 30 minutes from start to end. Kid K is so excited to talk about her piggy bank in "show and tell" at school this week .What do you think about this money saver piggy bank ?


Pinterest Projects - DIY Valentine Love Bugs

 Love is in the air and in my craft room as well. With my Kid K bugging me for a valentine craft project all I could think of was love bugs . So we both decided to start with making some hearts . We put them all together to create different love bugs. Of course first one was the butterfly . We only used scraps of cardstock paper we already had from previous projects . Reuse, reduce and recycle . Aptly what Kid K is learning in class currently. The size of our paper love bugs was pretty much defined by the size of scrap paper we had at hand . After a fun and love filled crafting session here is what we both came up with . Also Kid K learned a new skill .She can now easily use the mini heart punch  . It is her favorite crafting tool now . Can you tell ?


We used these bugs on every door in the house. Now our favorite room in the house is the "Monkey bedroom" and we clean up the "Ladybug room" aka toy room every day. Hope you all had a good valentine's day this year . 

Thursday, December 17, 2020

Pinterest Projects - DIY Wood Mason Jar Sign

Who doesn't love Buffalo plaid ? It is one of the oldest patterns around but still so current . It is widely used each year to decorate for christmas . The perfect graphic pattern with red, black and white colors . Yet has the traditional holiday colors and looks super festive . You can literally decorate every inch of the house with buffalo plaid for christmas and never get bored . Phew! You can never have enough of plaid decor in the house. Even little additions with this print can instantly transform the house making it look so apt for the holidays . Adding pillows in buffalo plaid to the couch or even porch swing is a great start . Swap table mats, add napkins or even charger plates or dinner plates in this print for the holiday dinner table set up . If you want to keep it simple just use some plaid wrapping paper for your presents . Save the scraps to reuse on gift tags , or mod podge ornaments with them for a rustic decor . Go Green . I mean Go Plaid .  

I was already feeling the buffalo plaid christmas vibe. And of course my craft room had this print in stock . I had vinyl sheets from Siser in buffalo plaid.  So I decided to try some project that I had not done before . I decided to add the vinyl to a laser-cut wood mason jar shape . You can easily find these cutouts at craft stores , Target and Amazon . Next I added some lettering in white vinyl . My Cricut Explore Air 2 came in handy again . Lastly added some jute twine and a tiny foam christmas tree sticker for a little pop of color . I just love the way it looks . A perfect door decor to hang . May be even a little DIY present to my like minded craft lover friend . What do you all think ?


Materials -

1. Mason jar shaped wood cutout

2. Vinyl - in buffalo plaid, black and white 

3. Scissors and a cutting machine ( I used Cricut Explore Air 2 )

4. Twine and embellishments (optional )


Step by step instructions -

 1. Measure the wood cutout  and accordingly cut the plaid vinyl . Stick it to the wood cutout. I added an image on Cricut design space to cut the buffalo plaid vinyl . Instead you can hand trace it on the plaid vinyl and cut it with scissors . 


2. Add lettering to the wood sign already covered in plaid . I used my cutting machine for white vinyl lettering . After weeding carefully I used transfer tape to transfer the lettering onto the wood sign . 

3.  Add a jute twine around the narrowest area of the wood sign . I wrapped it around 3 - 4 times and tied a knot in the end to look like a bow .

4. Add embellishments if you wish. Tiny foam christmas tree sticker came in handy. Love the pop of color in green . The little hint of sparkle is just perfect for the holidays . 


Tips -

1. You can use paint instead of the vinyl. Use a sealer afterwards if you paint .

2. You can also drill holes to add a wire or twine as a hanger .

3. Embellishments can be anything and everything . Foam stickers, felt stickers, tiny wood or real ornaments, pompoms etc. 


Thursday, November 26, 2020

Thanksgiving 2020

 Thanksgiving is a time for family. It is all about togetherness, sharing a meal with your loved ones ,being thankful and grateful . Given the pandemic it will be a very different kind of celebration this year. Some families may even be doing a virtual thanksgiving celebration this year. It can still be a beautiful celebration if we all act responsibly and do our part to limit the spread of disease. 

I am so blessed and thankful this year that my parents are here with me on this special day. So I cooked a very simple menu ahead of thanksgiving day yesterday . It turned out to be simple but delicious . No traditions, no staples but a simple healthy heartful meal with my loved ones. What else can I ask for? Just feel blessed. My heart is full of gratitude . Sharing my plate with you . 


How do you plan to celebrate this day ?

Friday, November 6, 2020

DIY - Diwali Akashdiwa

 Diwali is next week. I am so excited to decorate the house for this big upcoming festival. Diwali is celebration of lights. Back home I used to make a "kandeel" or "akash diwa " every year to hang in our balcony (or patio ). Every year it was a big ordeal to go shopping for craft supplies along with my mom while she picked out groceries to make "faral " or sweets. So like my childhood days or actually a childhood tradition  I still make akashdiwa every year. Now my kids join in too. Fun crafting time with mommy. So here is our 2020 version of "akashdiwa" or "wind sock" as my kindergartener says .


Supplies -

Paper - Any kind that is thin and easy to  fold- crepe /glitter/cardstock/construction 

Scissors

Glue

Embellishments (optional )


Step by step instructions -

1. Fold the A4 size construction paper in half lengthwise .

2. Leaving a margin of about 1.5cm on either side start making linear cuts lengthwise starting from the folded edge(edge that is still together/bound from the fold ). Do not cut all the way to the open edges. leave about 2 cm from the top.


3. Open the sheet and add crepe ribbons to one of the sides (one that is longer in length )


4. Fold around and glue the sides together (at the shorter length) . 

5. Add embellishments as you wish. I used scraps of blue paper and cut out stars and hearts using a mini punch. Recycle and reuse . 


6. Punch holes and add a string/ribbon/yarn to hang it .


So which color is your handmade akashdiwa ?

Friday, September 18, 2020

International Talk Like a Pirate Day


Ahoy, maties ! Happy International Talk Like a Pirate day . You think I am making it up. Aye! Don't you ?  But I am not. Check Wikipedia or do some google search yourself . Here are some fun facts I found online. The idea for this day was born in 1995 in Albany, Oregon. Two friends named John "Ol' CHumbucket " Baur and Mark "Cap'n Slappy "Summers came up with this idea .This movement or made up holiday or whatever you want to say it is has grown over the years. 
So I thought today will be just the perfect day to share some cool pirate related craft activities. Easy DIY things to dress up as a pirate. Before our rickety ship sails let's get ye educated . Avast ye ! As I work on my pirate literacy why don't you try these crafts ? Yo ho ho !

Materials -

1. Black cardstock

2. White cardstock  (optional)

3. White paint

4. Black thread 

5. Jute twine 

6. Kitchen towel paper tube 

7. Scissors, glue, tape 


Pirate Eye Patch -

1. Cut a circle from black cardstock . Size it such that it will cover your eye. Chop off less than 1/4th part of the circle across. Draw a skull picture with white paint . Add black thread to the back of your eye patch . Tie it on matey !


Pirate Hat -

1. Cut a 2'' wide and very long strip out of black cardstock. The strip should be long enough to cover the entire circumference of your head . Glue the ends together to make a crown/ring to fit around your head .


2. Make 2 cut outs from the black cardstock . The cut outs should look like this picture .


3. Using white paint draw a skull on one cut out and crossbones on the other. Add cutouts to the long strip such that one is in the front (sitting above the forehead ) and one in the back of your head sitting below the crown of your head .Your pirate hat is ready.


Hair Extension -

1.Cut jute twine in 3 pieces depending on how long your hair is. Match it to the same length or just a bit shorter . 

2. Braid the 3 pieces together. Use a hairclip to secure and wear the braid. Your hair extension is ready .


Lastly the kitchen paper towel tube can be used as a telescope. All Hand Hoay !


Sunday, September 13, 2020

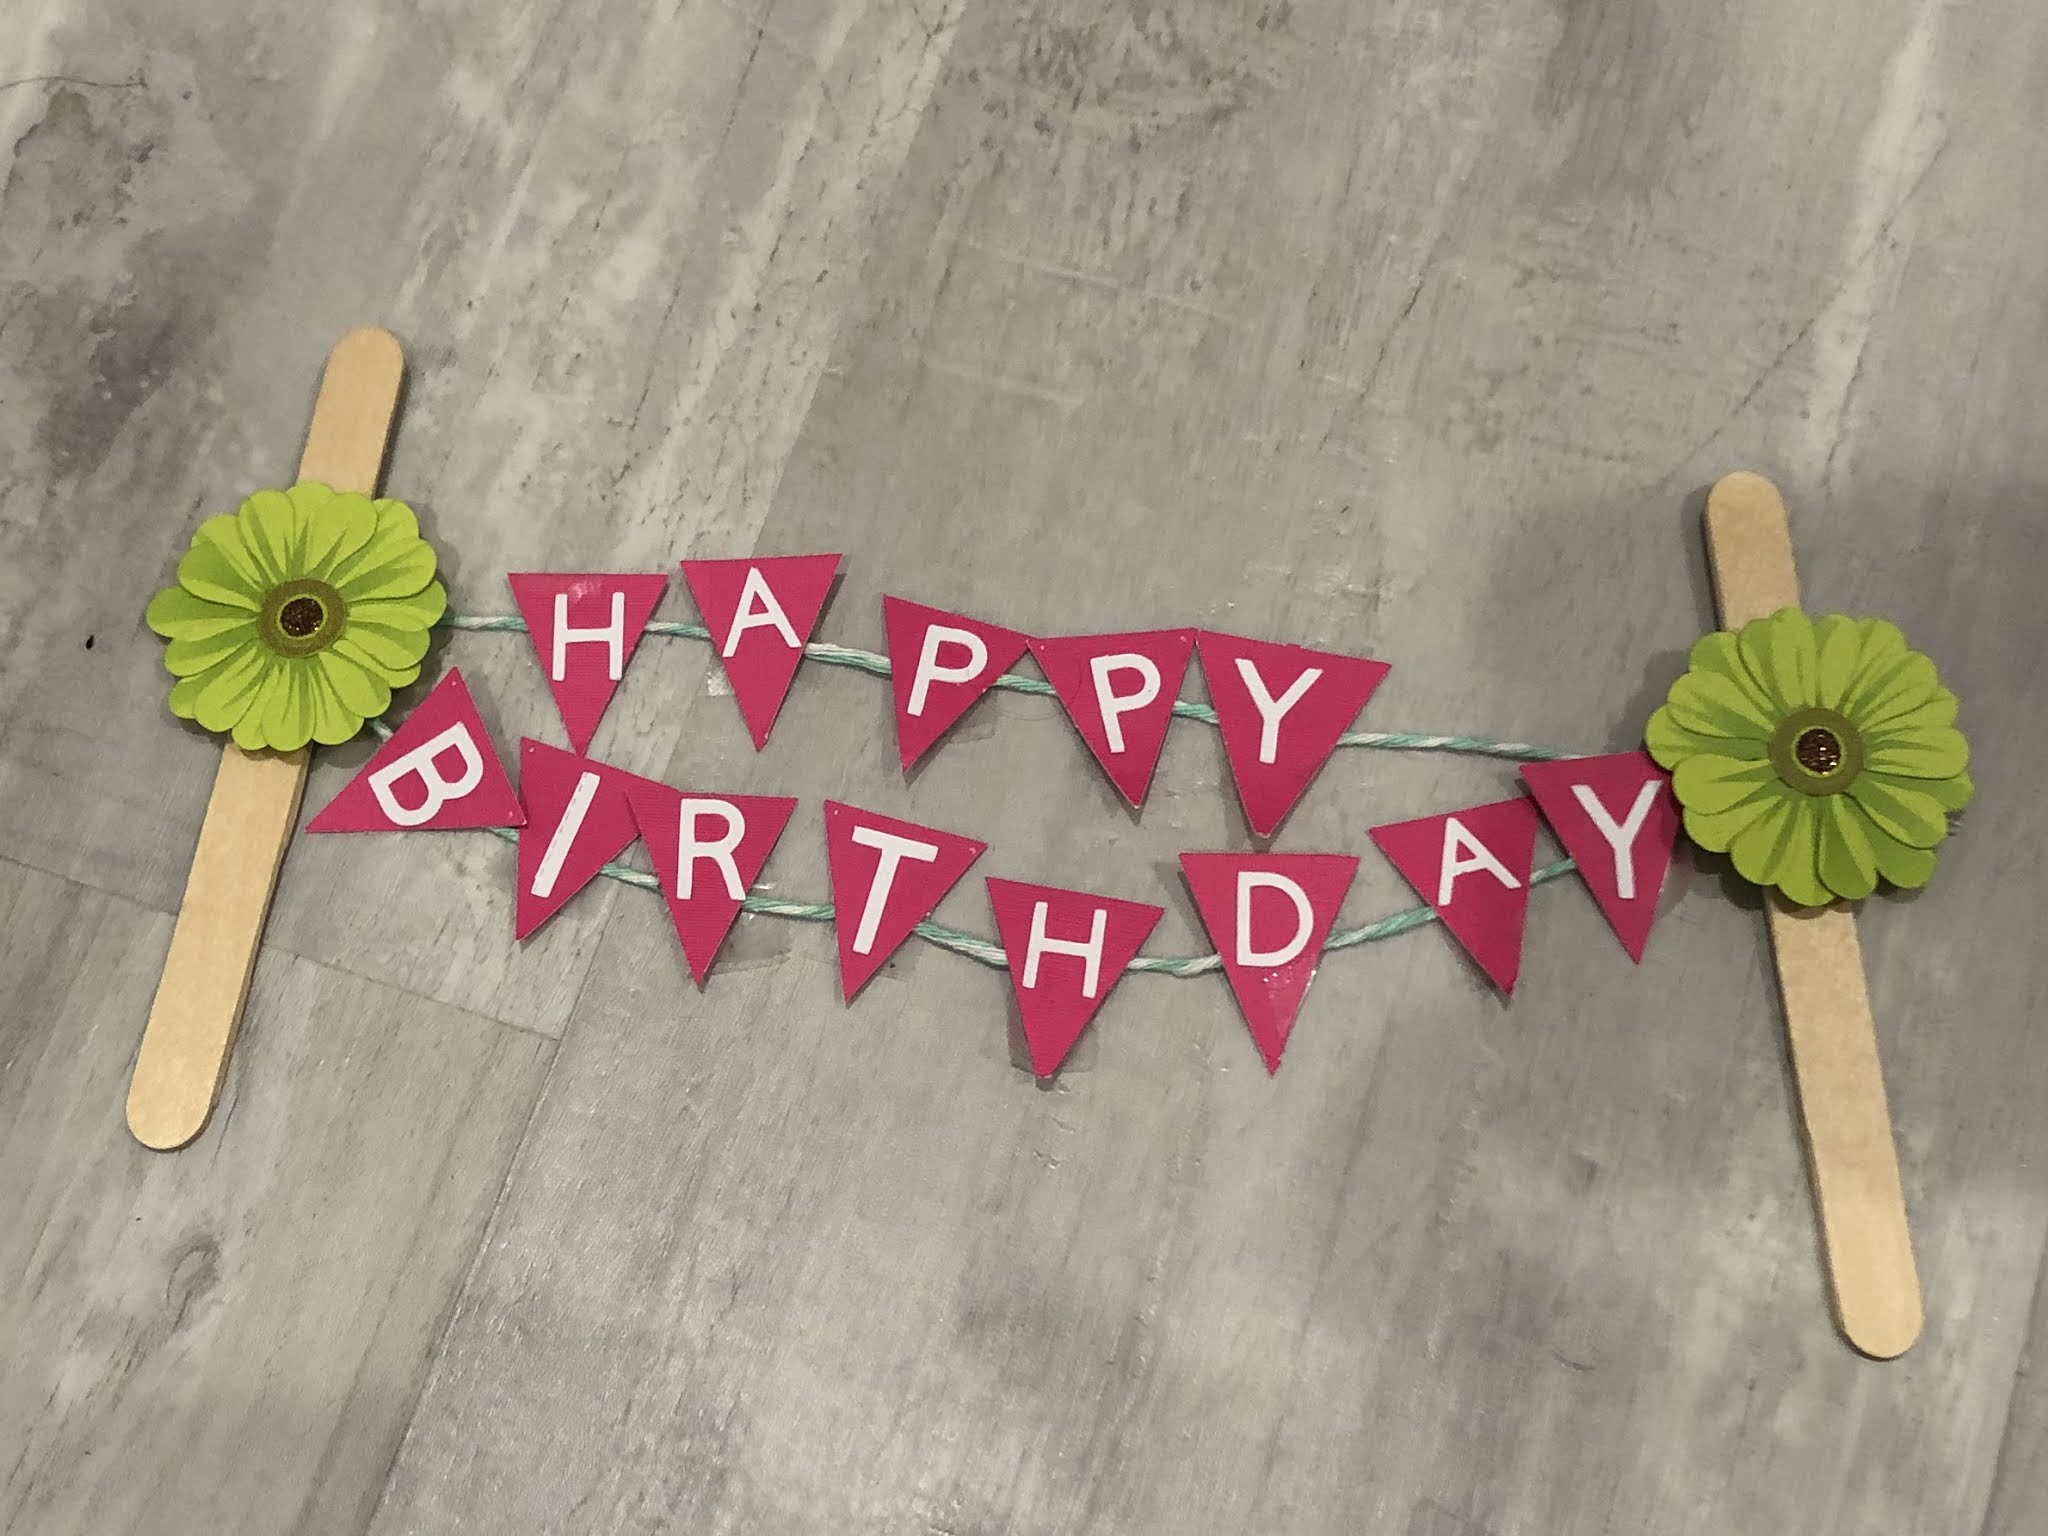
DIY Cake Bunting

I just love decorating for all occasions . You just name it- festivals, birthdays, parties, baby showers . And  I love DIY decorations more than store brought ones. I know my kids could care less if their mom made decorations or brought them from store for their birthday . But I enjoy every bit of the process of making decorations. During the Pandemic was my birthday. We were in the initial phase when there was a lockdown. All the quarantine talk, social distancing measures  and scary news everyday felt so depressing.  I wanted to do something to cheer me up . So I decided to make a cute little cake bunting. Arts and crafts activities are my stress busters. With the materials on hand I started working on this project. In less than 30mins I finished it too. A cute little bunting was a perfect addition to my home baked eggless date cake. I love the contrast of mint twine against the pink colored triangles. The 3D green flowers were a perfect addition . The green color was so fresh that it brought a smile on my face and heightened the much needed positivity. After all adorable and handmade is what I love and it makes me happy . Did you like my bunting ?

Materials-

1. Cardstock paper 

2. Twine

3. Popsicle sticks

4. Scissors , glue and tape

5. Embellishments (optional )


Step by step instructions -

1. Cut little triangles(or any other shape you like ) from pink cardstock. 

2. Cut the alphabets in white cardstock . I used my Cricut machine to cut the alphabets .

3.  Glue the letters onto the traingles .

4. Using a tape add the triangles onto a baker's twine.

5.Wrap the twine over the popsicle sticks at the edge tying a knot to secure the bunting .

6. Add embellishments to cover the knot which secured the twine to the popsicle sticks. I used the 3D flower stickers .


Tips -

1. Wooden skewers or drinking straws work well to make a bunting . I used popsicle sticks since I did not have anything else at hand . 

2. Spacing is the key to fit the bunting on the cake .

3.You can punch holes and thread the twine instead of using tape. 

4. Replace pre made embellishments with shapes cut from cardstock. Stars, balloons, hearts to name a few . Get creative. 

5.Instead of cutting alphabets from cardstock you can hand write or stencil the letters. 

Fall Decor Ideas

Fall to me means family, guests, get together. I love to decorate in sync with the season. With the pandemic this year we will not be inviting people over. But that is no excuse to not decorate the house. I love fall and I love decorating the house. Pumpkins, buntings, wreaths , warm knit blankets and so much more. Freshening up the front porch or a change in mantle decor or just setting up the dinning table with a new runner sets in the mood for the season. 

Instead of buying new things for decor I always raid the basement or my craft room. I love arts and craft . So creating new projects for home decor is like my favorite thing to do and a good stress buster too. I recently made a fall bunting from cardstock. it was so much fun and a quick project with my kid K.  I already had the autumn leaves SVG saved on my Cricut Design Space from that project. So I decided to use the same SVG images and create something to co-ordinate with the fall bunting. For this new project I used scraps of paper from the previous bunting project (go green and recycle ). This pandemic has surely taught me to make the most use of all that I already have, buy less and reduce clutter.  I had previously purchased a blank wooden plaque from Michaels. It was just gathering dust in the basement. So I made a small hanging card (if that is even a real word ) and added it to the wooden plaque to make a wall sign. I used Cricut Explore Air 2 to write the words as well as cut the tiny autumn leaves. I had some orange baker's twine that I used to sort of look like hanging leaves on display at an oval window.  I just love how the beige card looks against the color of wooden plaque. What do you all think ?


Chale Chalo - My 5K Experience

 " I am capable of more than I thought " is what crossed my mind this morning as I crossed the finish line after walking the 5K. r...