Toddler K loves to travel but hates car rides. Plane rides are not much fun either. She just wants to be at a destination in the wink of an eye . Our household fantasy version of " I dream of Jeannie "(wink wink and here you go Master ) . So I constantly keep looking for ideas to engage her during our travel . When I came across the idea of travel Lego case I knew she would love it . LEGO +DIY = Fun .
Speaking of DIY what better place than pinterest for inspiration . I saw different versions of this travel case. finally I decided to start with the materials I had at hand . So chose the Frozen themed tin box which has buried under the mountain of toys . It really was frozen( read forgotten ) underneath the pile . With Amazon as my go to online store these days I found rest of the materials for this project in a single click and delivered to my door step . The project was super quick and I was very happy with the end result . Toddler K was so excited when she saw the new version of her Frozen box and LEGO pieces together . When I saw the sparkle in her eyes I was beaming with pride on finally accomplishing a long pending project that was so worth it .
Materials needed -
1. LEGO Duplo Green Building Plate
2. Scotch Removable Mounting Squares
3. Few LEGO pieces, Scissors and Sanding Sponge
Here are the step by step instructions -
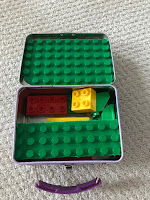
1. Cut the building plate to fit the lunch box lid. Size it such that there is some margin around the Lego plate once it fits on the lid ( Pic on your right ) . If you cut the exact size of the lid from end to end then the box will not shut (Pic on your left ). Simple scissors that I had at hand did a fantastic job at cutting the building plate .
 |
| Note the edges of base plate are now trimmed |
2. Now sand the edges and corners to make them smooth . This will protect those tiny hands playing LEGO from getting scratches due to the sharp unfinished edges .
3. Using the mounting squares secure the base plate onto the lid. I have cut the 1 inch pieces in half and used each one at every corner of the plate . If Toddler K at some point wants to use the base plate separately from the box then it would easily come off. Hence I used the removable squares . ( Never know what a toddler brain can come up with ! )
4. Finally add a handful of LEGO Duplo pieces into the box and you are ready to go (on a looooong car or plane ride ). At least that is what I wish for .
Tips -
1. You can use a plastic box instead of the metal tin . Plastic ones are much cheaper .
2 . If you wish to fit more LEGO Duplo pieces than just a handful use a larger sized box.
3. You can add felt paper or cloth at the base of the box to dampen some of the noise , especially if your little one like mine loves to shake the box constantly to make "some music "as she calls it .
4. You can use regular building plate instead of the Duplo one . I have heard the Duplo pieces work equally well with either plate. I used the Duplo plate for my project .
5. You can secure LEGO pieces from falling out of the box by adding an extra building plate across the grooves in the box . I chose to add it later on to improve functionality .
Now I am thinking I should make few more such kits to give away as presents and share with Toddler K's cousins . What are your thoughts ?


